
Sooo… you’ve decided to make a game and use Unreal Engine.
Either you have been using a pre-compiled Epic Games Launcher version of the engine so far, but want to change that now, or you are just starting out and want to go whole hog into fully source territory from day one.
Let’s get into how we can make that happen for you.
But before, here is the complete documentation on it from Epic itself.
I’ll show here a bit of a condensed and simpler version just concerning how to grab the source engine from Git and get it up and running.
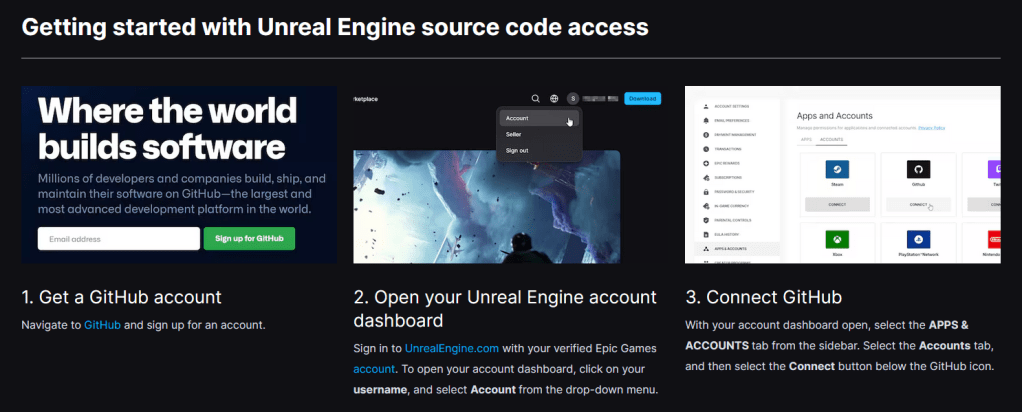
Link your Git and Epic Account
First, you’ll need access to the Epic’s Git repository. By default, you can see some things on their repo but not their engine source. It’s fairly easy and straightforward to remedy that, though.
You simply have to connect your Git and Epic account – here are instructions on how to do this.
I also took the liberty of taking some screenshots of their instructions, in case the website/link does not work.

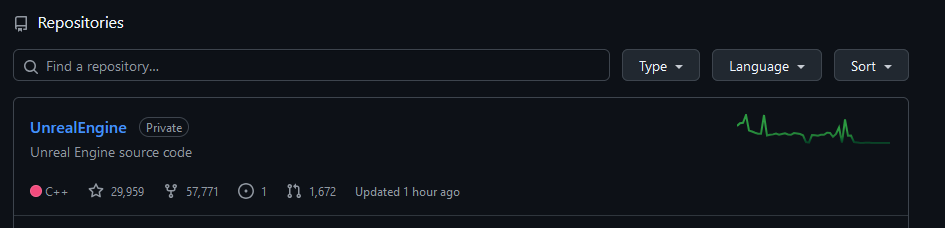
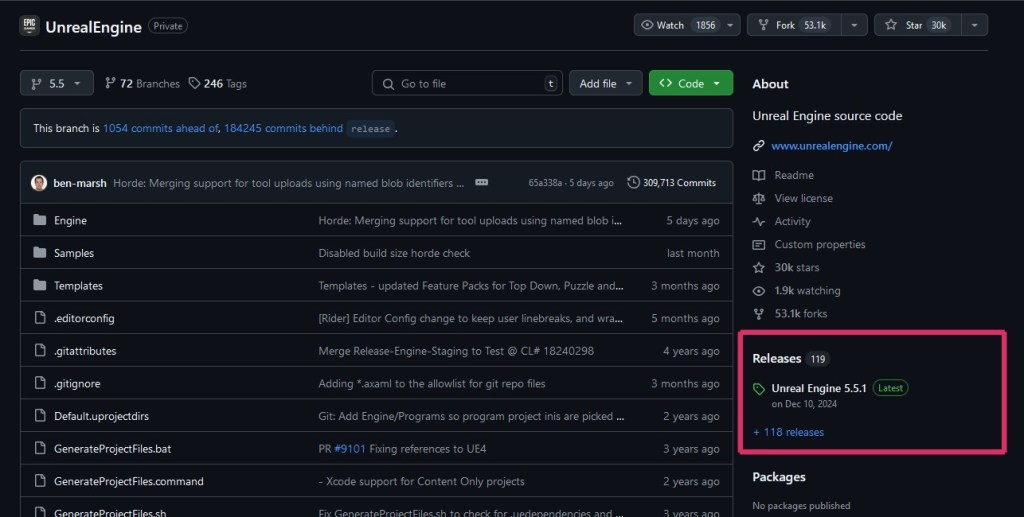
Now when you log into your GitHub and navigate to the Epics repository, you should be able to see their engine source.
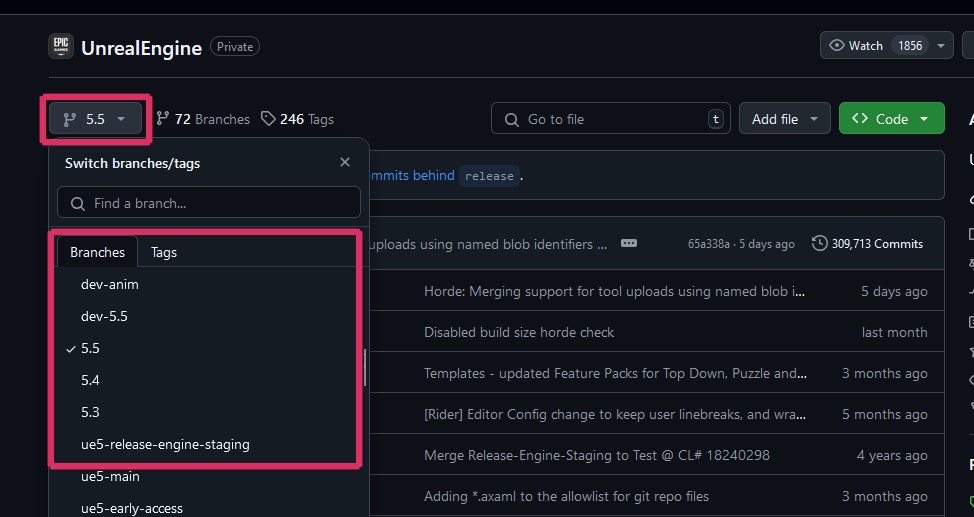
I would recommend not grabbing whatever is latest on their main branch as it might not be terribly stable and frequent changes will be made to it.
Instead picking a release branch that maps to either a version of the engine you have been using so far, or one you want to use. There should be one for each major release (e.g. 5.4, 5.5, etc).
Simply click in the top left dropdown box and select the branch you want (or have a browse around others if you want, to have a little nose about changes going in 😉)
Then you can either choose to fork the Git repo or download the ZIP version.
Fork Vs Zip
The main point of forking the repo is that it’s like you have your own git-hosted version of the engine.
You can commit any custom changes you made to it and keep track of them easily and even create pull requests to Epic with your changes, as far as I am aware (e.g., if they are genuine bug fixes).
It should also make upgrading to a newer engine version more straightforward.
This is probably the most sensible solution if you plan to make frequent engine changes.
Here is more info on forking repos: GitHub Docu.
Just downloading a zip is mainly useful if you want to host the code yourself or just want to have it locally and offline.
For that, you can simply download a zip from GitHub on the release branch you selected.
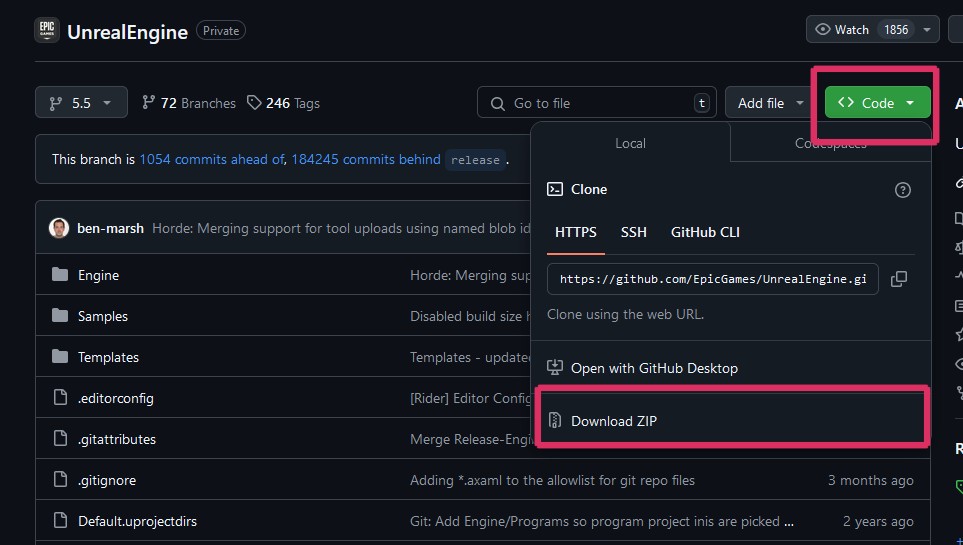
Alternatively, you can also download a zip file from Epic’s published releases on GitHub.

Getting Things Up and Running
Once you have downloaded the source code, you simply have to:
- Unzip into your target location (if you downloaded a zip and didn’t fork the git repo, otherwise sync your repo)
- Run the Setup.bat – this should already be in the root folder of your engine
The next 2 steps might be optional, but I do them to ensure everything is working correctly, or you have to do them if you intend to compile and launch the whole engine.
- Run GenerateProjectFiles.bat – this should also be in the root folder of your engine.
- Open the solution (sln) in Visual Studio and see if everything loads correctly – I had to download a newer .NET framework for it to work, but the IDE told me which one to download.
Now I recommend not compiling the whole engine, unless you plan to launch it on its own without a game project; it will just take a long time and create GBs of intermediates that clog up your hard drive.
If you do not have a game project yet, you will have to compile and boot the engine anyway to create a new game project.
But if you have a game project already, you can skip this since compiling the game will also compile what it needs from the engine.
So either your next step is to compile and boot the engine and create a new project or swap over an existing project to the source engine.
Let’s look into the 2nd option further.
Swap an Existing Project
Swapping an existing game project to a source engine is super easy, thankfully. All you have to do is navigate to your game project folder and find your .uproject file.
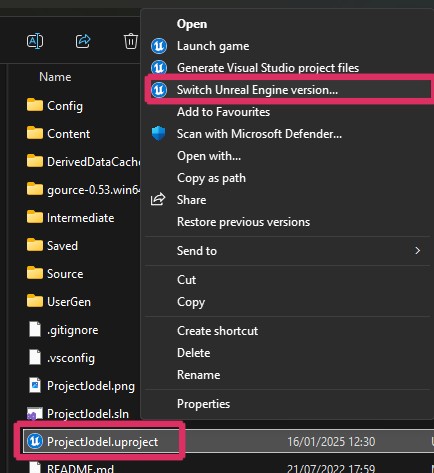
(On Win11 you have to click ‘Show more Options to see them all’)
Then a popup appears showing you all installed engine versions. There should now also be a source version, either showing up via a unique identifier (a sequence of letters and numbers) or with a path to your engine.
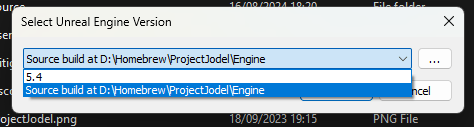
If it doesn’t show up, you can try navigating manually to the path where the engine has been installed – you can do this by clicking on the button with 3 dots on the right.
And that’s all you need to do to swap engines. You should now have a modified .uproject file that uses the source engine as the engine version.

To make sure everything was setup correctly, I also regenerated project files for my game project once after swapping engines.
Then you can open your project as usual via the solution file and make any game or engine changes as you see fit.
The initial compilation may require additional time if the engine has not been compiled previously; however, subsequent compilations should return to a relatively standard duration.
There is a slight boot-up overhead associated with utilizing the source version of the engine in this manner, as it requires the processing of the build tools upon each boot; nevertheless, it should remain manageable.
An alternative approach may involve compiling the engine independently and utilizing the binaries like a launcher version would, thereby circumventing the complexities associated with the build tools. However, I haven’t tested this method and do not know if it is possible or an improvement.
I hope this helps, if there are any questions or feedback just pop them in the comments below ☺️

Leave a comment. (Email and Name are not required to be filled in)