
Today I am excited to show you something really fun that I have been up to lately in JodelTown – picking up any object procedurally with a single animation and also placing it down again.
To give you an idea what I am talking about here is short video showcasing what I mean.
So as you can see, we can pick up any object, ensure we are actually making contact with that object, all while using a singular animation. And then even placing down the object, making sure it lands exactly where I clicked on.
And all you need to achieve this is a little linear algebra and some IK magic.
Of course you could expand this feature even further by making sure your hand is also closing correctly around the object, choosing from a couple of different animations to allow for more artistic control and enabling a holding animation when an item is held.
But this early version took me a couple hours to implement and before making things more complex, let’s break down how exactly I implemented this so far.
To make this easy let’s just work our way step by step through the process.
Content Setup
First, we have to somehow determine where we can pick objects up. There are a few ways you could go about this; for example, fully dynamically raycasting against the object and finding a suitable location.
However, I went with a more authored solution that gives me more control over how and where objects are pick-up-able.
To determine this, I simply add a few sockets to the static meshes that I want to pick up and orient them in a way that will match my pick-up socket on the character’s skel mesh (more on this later 🙂). But you can think of it as a matching set of points on the object and character that we want to match/overlay with each other at runtime.
In case you did not know that static meshes can also have sockets – they do! Just open the Socket Manager window when viewing a static mesh and click the little + sign to add new sockets.

So for our little horsey here, I added two sockets. One slightly more to the left and one slightly more to the right, but both on the top of the horse’s back.
You can also choose to have only a single socket, or many more if you want to.
These sockets will determine where the characters can grab objects.
Here are some more examples:


Now let’s have a look at the character counterpart.
On each hand, I have added a new socket called ‘pickupSocket_r’ and ‘pickupSocket_l’ – although you can, of course, name them whatever you want.
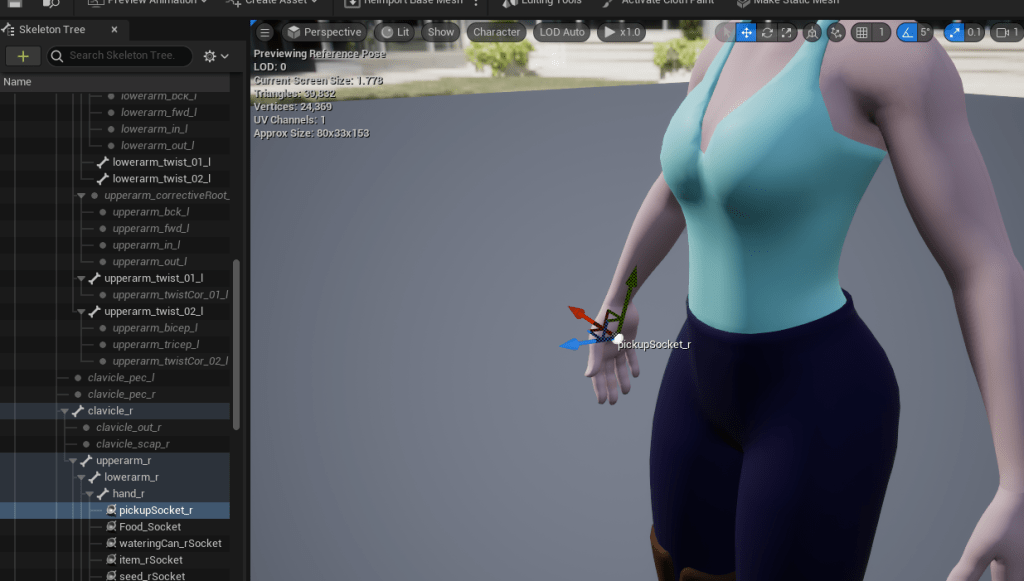
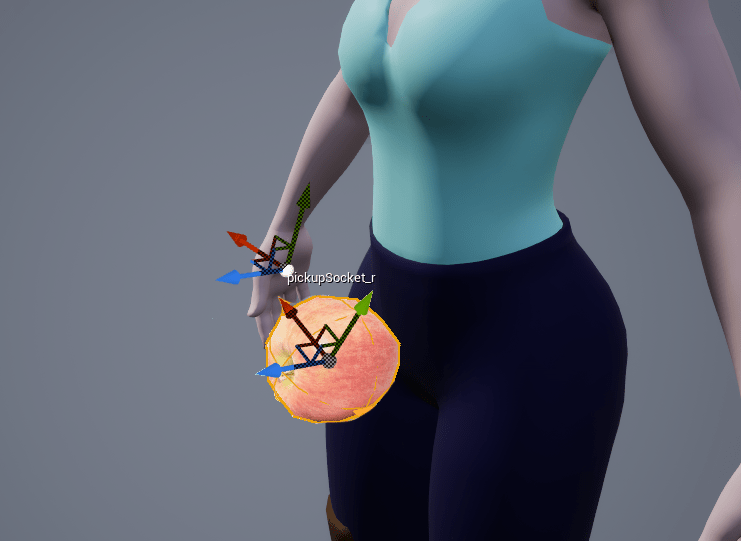
The only thing we want to be considerate about here is that the rotation of the socket matches the object’s socket rotation – so they line up as you expect them when the object’s socket rotation aligns with the hand socket. I hope the image below illustrates the point more clearly.
And that’s really all the setup we need to do on the content side – however there is so more animation setup we have to look into so we will do that next.
Animation Setup
On the animation side there are three major points I want to hit: The IK setup, the Pick Up Animation and Blending the IK in and out.
IK Setup
The IK’s (Inverse Kinematic) responsibility is to make sure we alter our pick up animation in a way that ensures that we hit the pickup point on the object we are interacting with.
There are different IK solutions you could use; for example, a Two-Bone IK could be sufficient. However, I went for a Full-Body IK (FBIK) solution to alter more of the body’s joints, increasing the reach of the pickup and also to achieve a more natural looking result.
Thankfully, since we are using UE5, we are lucky duckies and can make use of their Control Rig assets, which offer (besides a lot of other functionality) a FBIK node, which we can just utilize without a lot of fuss.
Check out the official doc of Control Rig here for more info.
To keep things a little more condensed, I will assume you have some basic knowledge of Control Rig and how to create them.
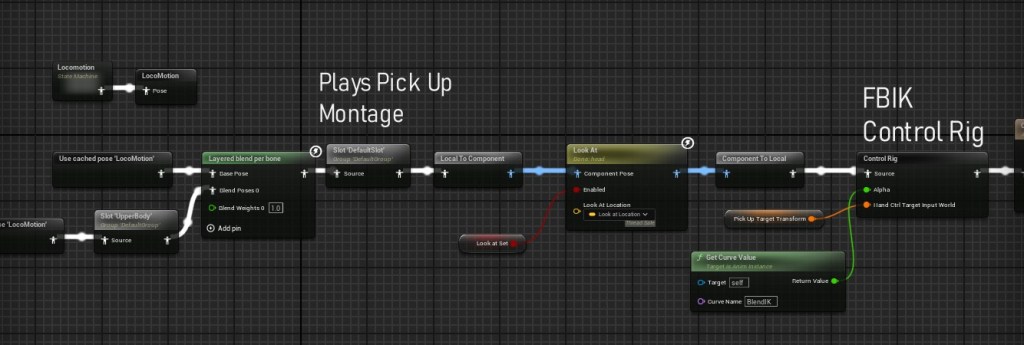
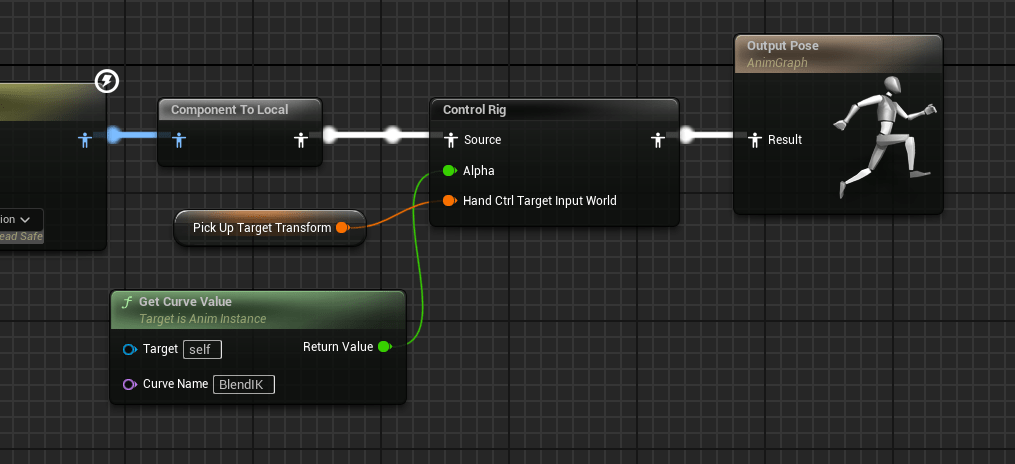
My setup to control the right hand looks something like this (left hand support is accounted for in the code, but I have not gotten around to set up the Control Rig for it).

It’s really a rather simple setup; I have a transform that will be passed in, which is the target point we want to reach with the IK.
If that transform is empty, we just use the original hand location – although it’s worth mentioning that realistically, if that is the case, the Ctrl Rig will not be evaluated anymore by the owning anim graph.
But for performance’s sake, we should not even execute the FBIK node if no valid target transform is set.
We then move a control to the target location and use the control’s transform as the input for the FBIK node.
I won’t get too much into detail about how to set up the FBIK node here, as there is much better documentation and how-tos already out there, and to do them justice, this post would become a book. 😄
One thing, however, to note here is that the target transform we pass into the control rig is not the transform of the pickup socket on the to-be-picked-up object.
Our IK will move the hand bone, and we don’t need the hand bone to be at the object-socket location and rotation, but we want the pickup socket (on the character) we created earlier to be at that location instead.
So actually we have to calculate what the hand transform needs to be to ensure that that pickup socket will land on the object socket – this is were some fun linear algebra will come in later.
Pick up Animation and Blending IK
The pick up animation will be played as a Montage on a Slot in our Anim Graph.
The anim itself is just a simple pick up animation, I quickly grabbed off the asset store and created a montage asset with it.
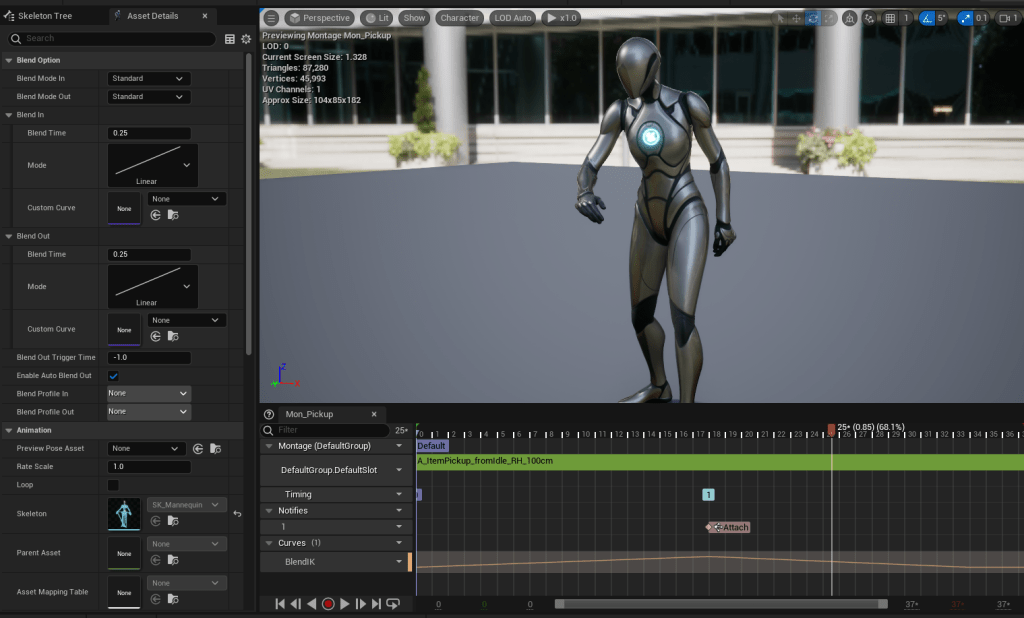
Two things here, that are actually important for our system is the Montage Notify ‘Attach’ – we use this in code to determine when we actually want to attach the object actor to this characters hand.
The other thing is the ‘Blend IK’ Curve which I added to this montage and we will use to blend in and out the IK and have more control over the visuals.
As you might have spied above, we use this curve value to blend the whole control rig in and out.
Now we have setup all the content we need, and we only need the code that brings it all together.
The Code
This code it integrated into my wider interaction and pick up systems, but I only really want to focus on the parts that are in charge of calculating our target transform (the one we pass into the control rig) – so this won’t be a .h and .cpp you can just copy paste into your project, but it should hopefully get the idea across and set you up to make your own version.
For now this code also only supports picking up things with the right hand, but it is super easy to extend it for left hands as well.
bool PickUp(AActor* Target)
Whenever our pick up function is called (this lives on a component on the character) with a valid target, we look for a static mesh component on that target.
Once we have that we grab its world transform and calculate the direction between the character and the mesh.
We also create a new right vector in this character-to-mesh space to later determine which sockets on the target to use for the pick up for a given hand. E.g. if we pick up with the right hand we want to choose a socket on the right side of the object, relative to the character.
// Calculate IK target and blend it in

// Grab the static mesh component of the target object (we might want to support multiple components in the future)
UStaticMeshComponent* StaticMeshComp = Target->FindComponentByClass<UStaticMeshComponent>();
if (!StaticMeshComp)
{
	return false;
}

// Grab the world transform of the static mesh component
// We need this later for calculating the direction between mesh and mesh sockets as well as the direction from the character to the static mesh
const FTransform MeshTransform = StaticMeshComp->GetComponentTransform();

// Calculates the direction from the the character to the mesh and get rid of the Z component since we really only need to be concerned about the x-y plane
FVector ActorToMeshDirection = MeshTransform.GetLocation() - GetOwner()->GetActorLocation();
ActorToMeshDirection.Z = 0;
ActorToMeshDirection.Normalize();

// We are creating a new right vector between the ActorToMeshDirection and the up vector (for most use cases the global up vector should be good enough)
// We need this character-mesh relative right vector to determine if a socket on the static mesh is on the right or left of the character
FVector TestRightVector = FVector::CrossProduct(FVector::UpVector, ActorToMeshDirection);
TestRightVector.Normalize();
Now we select which socket on the object is the most sensible to choose for the pick up.
For now we assume all pick ups are done with the right hand, and we pick the socket closest to the current location of the hand. You might want a different rule for socket selection, but this works well for my use cases.
USkeletalMeshComponent* SkelMeshComp = GetOwner()->FindComponentByClass<USkeletalMeshComponent>();
if (!SkelMeshComp)
{
	return false;
}

const FTransform MeshPickUpSocketTransform_World = SkelMeshComp->GetSocketTransform(FName("pickupSocket_r"), RTS_World);

TArray<FName> SocketNames = StaticMeshComp->GetAllSocketNames();

// For now this is a placeholder value for which hand we use to pick up object, if true its the right hand.
bool bPickRightSideSockets = true;
float MinDistance = FLT_MAX;
for (const FName& SocketName : SocketNames)
{
	const FTransform SocketTransform = StaticMeshComp->GetSocketTransform(SocketName, RTS_World);
	const FVector MeshToSocketDirection = (SocketTransform.GetLocation() - MeshTransform.GetLocation()).GetSafeNormal();

	// positive value means both point mostly in the same direction, 0 means they are perpendicular
	const bool bIsOnRightSideOfMesh = FVector::DotProduct(MeshToSocketDirection, TestRightVector) >= 0;
	if (bPickRightSideSockets && !bIsOnRightSideOfMesh)
	{
		continue;
	}

	const float DistanceHandToSocket = FVector::Dist(SocketTransform.GetLocation(), MeshPickUpSocketTransform_World.GetLocation());
	if (DistanceHandToSocket < MinDistance)
	{
		MinDistance = DistanceHandToSocket;
		SelectedSocketName = SocketName;
	}
}
As a fallback, in my case, I chose any socket if it couldn’t find an appropriate one, and if there are no sockets at all, it bails out of the function.
(In my case, if there is only one socket on the object, I could also skip the foreach loop entirely, really.)
if (SelectedSocketName.IsNone())
{
	if (SocketNames.Num() > 0)
	{
		SelectedSocketName = SocketNames[0];
	}
	else
	{
		// error
		return false;
	}

}
Once we have the socket we want to pick the object by selected, we can finally calculate the target transform of the character’s hand/wrist that will ensure that we align correctly with the target object.
That might sound complicated but really it’s just a bit of transforming between different spaces.
- We take the world transform of the object socket we selected and move it into the skel mesh space of our character.
- Using the relative bone space transform of the pick up socket on the characters hand, we modify the mesh space adjusted object socket transform – this gives us the target transform for the wrist that means the pick up socket on the hand will line up with the object socket on the pick up.
- Since our control rig expects a world transform, we move it back into world space (however you could use component space as well)
- Then we just have to pass it along to the anim graph so we can pass it to the control rig.
const FTransform MeshSocketTransform_World = StaticMeshComp->GetSocketTransform(SelectedSocketName, RTS_World);

DrawDebugSphere(GetWorld(), MeshSocketTransform_World.GetLocation(), 5.0f, 6, FColor::Magenta, false, 10.0f);

// now we need the delta between hand socket and wrist to then apply that to the mesh socket to work out the target wrist location
const FTransform PickUpSocketTransform_Local = SkelMeshComp->GetSocketTransform(FName("pickupSocket_r"), RTS_ParentBoneSpace);

const FTransform ComponentSpaceToWorldTranform = SkelMeshComp->GetRelativeTransform() * GetOwner()->GetActorTransform();
const FTransform MeshSocketTransform_CharacterComponentSpace = MeshSocketTransform_World * ComponentSpaceToWorldTranform.Inverse();

const FTransform TargetWristLocation_Component = PickUpSocketTransform_Local.Inverse() * MeshSocketTransform_CharacterComponentSpace;
const FTransform TargetWristLocation_World = TargetWristLocation_Component * ComponentSpaceToWorldTranform;

DrawDebugSphere(GetWorld(), TargetWristLocation_World.GetLocation(), 5.0f, 6, FColor::Purple, true);

APJBaseCharacter* OwningCharacter = Cast<APJBaseCharacter>(GetOwner());
if (OwningCharacter && OwningCharacter->GetMesh() && OwningCharacter->GetMesh()->GetAnimInstance())
{
	if (OwningCharacter->GetMesh()->GetAnimInstance()->GetClass()->ImplementsInterface(UPJAnimInstancePropertyInterface::StaticClass()))
	{
		IPJAnimInstancePropertyInterface::Execute_SetTransformProperty(OwningCharacter->GetMesh()->GetAnimInstance(), "PickUpTargetTransform", TargetWristLocation_World);
	}
}
And that’s really all there is to it. Of course, you have to handle playing the pickup animation as well and also handle attaching the object to the character.
In my case, after calculating the IK target, it will start the pickup animation, and once the montage encounters the ‘Attach’ notify, we actually attach the target object to the character.
It could look something like this for example.
void APJBaseItem::PickUpItem(UPJPickUpComponent* CallingPickUpComponent, bool bFromInventory)
{
	if (ACharacter* InvokingCharacter = Cast<ACharacter>(CallingPickUpComponent->GetOwner()))
	{
		if (PickUpMontage && !bSkipPickUpAnimation)
		{
			const bool bWaitForNotifyToAttach = PJAnimationFunctionLibrary::ContainsNotifies(PickUpMontage, AttachNotifyName) && bAttachOnNotifyOnPickUp;
			if (bWaitForNotifyToAttach)
			{
				InvokingCharacter->GetMesh()->GetAnimInstance()->OnPlayMontageNotifyBegin.AddUniqueDynamic(this, &APJBaseItem::OnMontageNotifyReceived);
				const float PlayLength = InvokingCharacter->PlayAnimMontage(PickUpMontage);
				if (PlayLength <= 0.0f)
				{
					AttachTo(InvokingCharacter, bFromInventory);
				}
			}
		}
		else
		{
			AttachTo(InvokingCharacter, bFromInventory);
		}
	}
}
bool Drop(FVector DropLocation)
When dropping an item to a specific world location, the logic is fairly the same but you are working out what the target wrist transform has to be to place the object at that location.
One factor that comes in that we did not have to consider for the pick up is that if the pivot of the object is not at the bottom of the mesh, you have to account for the offset between pivot and bounds and add that when calculating the target transform – this is because the drop location will be the world location we want the object to be at, and not just the pivot of the object.
I hope this is useful to people out there as a starting point to implement procedural pick ups and drops. There is a lot more polish that will go into this to make it a production ready system, but this is a decent starting point.
Any questions, just drop them below and I’ll do my best to answer them.
Have a lovely week out there 👋🌈

Leave a comment. (Email and Name are not required to be filled in)